We’ve Answered The Questions About COMMAND Center™ We Hear Most Often
This section will tell you about the components you will need to purchase. For an idea of which options may fit best for you, see the sections that start with I want affordable and I want automatic.
You have to buy sensors and a download option. You will need your own PC and iOS device. Software is free.
Sensors
- Range in standard lengths (4-50 ft) and price ($39-$68); customs available, too.
- Standard lengths readily available.
- 1yr warranty.
- The sensors come preprogrammed and already turned on.
- Memory capacity is 2048 data points. Once the sensor is full, it will roll over and continue to collect data for 2yrs.
- Quantity discounts available.
Download options
There are three download options:
- Wireless Bluetooth
- You will need at least 1 SRM.
- You will need your own iOS device and Windows PC.
- You will need the free COMMAND Center™ App and Windows software.
- You must be on-site within 20-30 ft (6 m to 9 m) of the sensor to collect data.
- You will be able to create reports and share data via the Cloud with other App users for free.
- You will share data from the App to the Windows PC via email.
- Wireless AutoCollector
- You will need at least 1 AutoCollector.
- You will need on-site cell connectivity; cell plan included in the price as a 1-time fee.
- You will need your own iOS device and Windows PC.
- You will need the free COMMAND Center™ App and Windows software.
- You may want to include multiple SRMs.
- You will be able to create reports and share data via the Cloud for free and/or email.
- You will be able to set real-time alerts.
- Wired.
- You will need a USB clips cable.
- You will need your own PC with free COMMAND Center™ Windows software installed.
Software
You will need Windows software for your PC and the iOS App on your iOS device (iPhone or iPad).
- Windows software is free; you can order the link here:……….
- The iOS App can be found in the App Store. Search for COMMAND Center™ Concrete.
- You want the wireless Bluetooth option.
- You will need to buy COMMAND Center™ sensors.
- You will need to buy at least one Sensor Reader Module (SRM).
- You will need your own iOS device (iPhone, iPad, iPod).
- You will need to install the free COMMAND Center™ Concrete 4 App onto your iOS device.
- You will want to create a free COMMAND Center Cloud™ account.
- You will need to install the free Windows software for you PC if you are generating maturity curves or want to view data on your PC.
- You want the Wireless AutoCollector option.
- You will need to buy COMMAND Center™ sensors.
- You will need to buy at least one Sensor Reader Module (SRM). You will need to decide how many addition SRMs you will need based on how many sensors you need to collect data from at the same time and how far apart the sensors are from each other.
- You will need one AutoCollector for every 100 yards (90 meters).
- You will have to have cellular service on the jobsite.
- You DO NOT have to maintain any cellular plan for the AutoCollector; it is included!
- You will need your own iOS device (iPhone, iPad, iPod).
- You will need to install the free COMMAND Center™ Concrete 4 App onto your iOS device.
- You will need to create a free COMMAND Center Cloud™ account.
- You will need to install the free Windows software for you PC if you are generating maturity curves or want to view data on your PC.
- You want the wired option.
- You will need to buy COMMAND Center™ sensors.
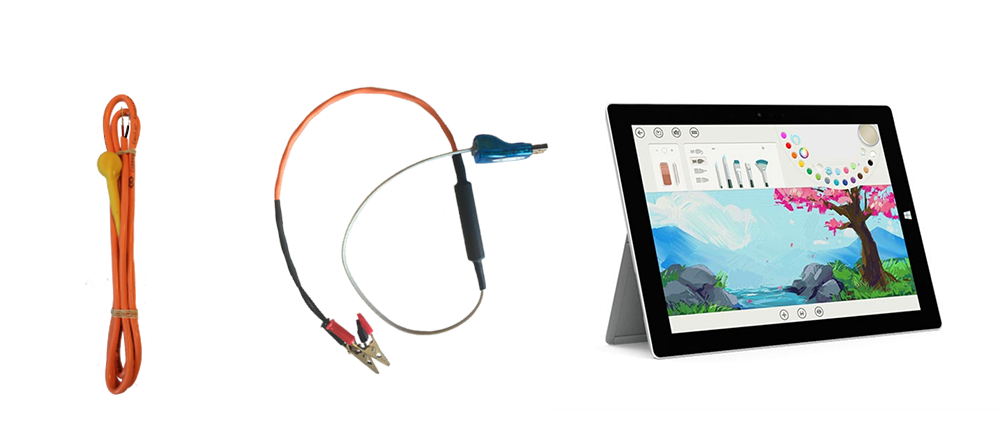
- You will need to buy a COMMAND Center™ USB download cable.
- You will need to download and install the free Windows software for PC.
- Install the free COMMAND Center™ Concrete 4 App.
- Create or sign into a COMMAND Center™ Cloud account.
- One person on the team is identified as the Creator.
- The Creator creates a project.
- The creator shares the project with other users and sets permission for those users.
- The creator or a single user with full access permissions creates a placement and enters placement specifications.
- Any user with full or limited access can add sensors to the placement.
- Anyone can set the equipment in the field.
- The creator or a single user with full access permissions can set alerts for a placement.
- Anyone with full or limited access can update sensor data.
- The creator or a single user with full access permissions can generate reports from the App.
- Users buy sensors and SRM.
- Sensors are secured in place. SRMS DO NOT have to have to be continuously connected the sensors. Sensors collect and store temperature and time data as programmed no matter if an SRM is attached or not. The SRMs act as data collectors and transmitters that only must be attached when you want to collect a copy of the data from the sensors and transmit it to the App where you can view it.
- A data collector goes out to the site and connects the SRM to the sensors to collect data.
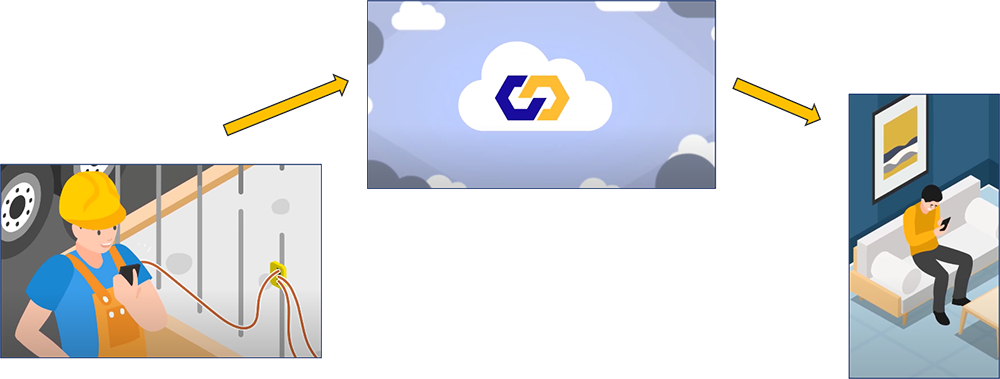
- Data is collected from the sensors and transmitted into the COMMAND Center™ iOS App via a Bluetooth connection. You DO NOT need a cellular or Wi-Fi connection to collect data.
- Once data is in the App, it can be pushed to the COMMAND Center Cloud™ via a Wi-Fi connection or the user’s data plan if they are using an iPhone or iPad with cellular connection.
- From the Cloud, data is then disseminated to all shared iOS App users.
- Shard users do not have to be on-site to receive updated data once it is collected.
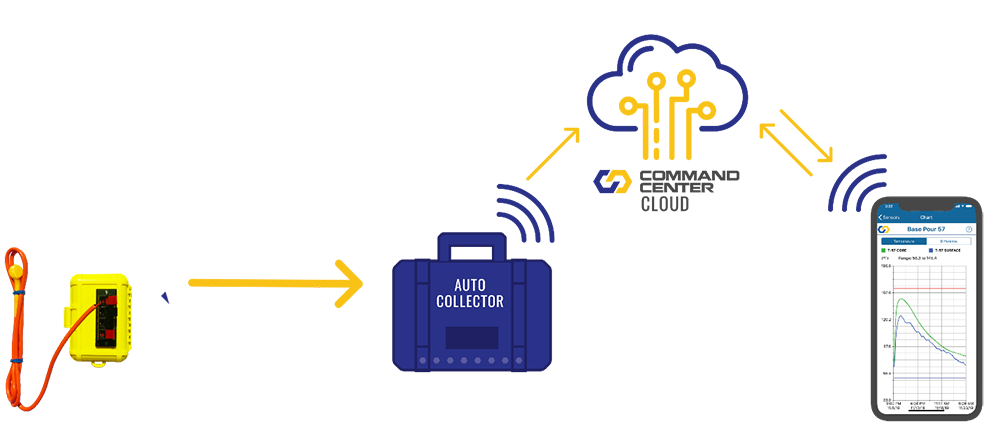
- Users buy sensors, SRMs, and AutoCollector.
- Sensors are secured in place and connected to SRMs and/or directly to the AutoCollector itself. In this case, sensors must be continuously connected to the AutoCollector or SRM so that every new data point collected by the sensor is transmitted automatically to the App.
- An AutoCollector is secured on-site within 100 yards of all SRMs.
- You can connect up to 2 sensors per SRM and 9 sensors to each AutoCollector.
- SRMs and the AutoCollector are turned on.
- Lights on the AutoCollector indicate if data is pushed successfully via a cellular connection.
- All iOS App users should see updated sensor data every time a new data point lands, which depends on the sensor interval.
- No one has to be on-site to receive updated data once it is collected.
- Users buy sensors, a USB download cable.
- Sensors are secured in place.
- One-by-one the user connects the clips to the end of the sensor and uses the Windows sofrware on a PC to collect the data.
- There is no access to the COMMAND Center Cloud™ to share data with other users.
- Users can create reports and send a copy of the COMMAND Center™ Windows software file to other PC users to view on their PC.
Use COMMAND Center™ Concrete 4 App!
The only reason to use the COMMAND Center™ 3.0 App is if a COMMMAND Center ™3.0 user shared a file from that App with you, or if you are in the middle of a project and already have existing data in the COMMAND Center™ 3.0 App that you are still updating.
- Users can generate a temperature differential report from the App.
- Sensors are labeled with a scan code.
- Sensors can be added to a placement by scanning.
- Labels include the sensor serial number and interval.
- Additional organization was added to reduced redundant data entry.
- Sensors grouped in placements under projects.
- Share the project with users only once to grant immediate access to all placements within the project.
- Updating data from multiple sensors on multiple SRMs all within range via BLE connection was improved and increased transparency added to the updating process with additional messaging to guide the user’s experience.
- For each placement, wireless Bluetooth users can select and update multiple sensors within range at once.
- Sensors that appear to update are only ones that have been previously added to the placement.
- Open the App.
- Sign in to your cloud account. (You will not have access to projects created in COMMAND Center™ 3.0.).
- If you are a new user, create a cloud account by tapping Sign up.
- Create a project.
- Share the project with other users.
- Create a Placement and enter Placement Specifications.
- Add sensors to the Placement (This is new to all users! Read here for details)
- Via wireless Bluetooth option.
- Via scanning.
- Update sensors (This is new to all users! Read here for details) Links to section below that talk about how to do this.
- via wireless Bluetooth option.
- via Wireless AutoCollect option.
- Set alerts.
- View data.
- Create reports. (Temperature Differential reports now available on the App!).
We Also Address Some Common Troubleshooting Questions
What is the COMMAND Center Cloud™?
- The COMMAND Center Cloud™ allows users to share data through the App.
- The Cloud stores your data.
- The Cloud is what sends data to shared users via the AutoCollector option.
How do I sign into the COMMAND Center Cloud™ in COMMAND Center™ Concrete 4 App?
- In the top right corner on the projects screen, tap on Sign In.
- Sign in with an existing account.
- Sign up to create a new one.
How do I use the COMMAND Center Cloud™ in COMMAND Center™ Concrete 4 App?
- Create a project.
- Tap on the setting icon to access the project details.
- Add participants by tapping the plus icon.
- Enter the email for the person you want to share that project with. Be sure the email you use is the email that person used to create their own COMMAND Center Cloud™ account.
- Select how you want to share the project:
- Full access – the other user can view/edit the specs of project or placements, create reports, and share the project with additional new users.
- Limited access – the other user cannot access the specs or share options within the project and placement.
No, the Cloud is only accessible through the COMMAND Center™ 3.0 or COMMAND Center™ Concrete 4 App. The Cloud is a means of sharing data in real-time between App users. The Cloud is also the means by which the AutoCollector users receive data from the cellular connection.
- In the top right on the Home screen, tap on the account icon.
- Tap Invitations.
- Yes, open the App.
- On projects screen, tap Sign In.
Use the same user name and password you used to create your account in COMMAND Center™ 3.0.
You will not be able to see any of the projects you created in COMMAND Center™ 3.0. Projects are specific to the version of the COMMAND Center™ App that they were created in. Projects created in COMMAND Center™ Concrete 4 App will only be accessible in COMMAND Center™ Concrete 4 App and projects created in COMMAND Center™ 3.0 can only be access in COMMAND Center™ 3.0.
Yes, you may need to have both COMMAND Center™ 3.0 and COMMAND Center™ Concrete 4 App versions of the App on your device at the same time. Projects are specific to the version of the COMMAND Center™ App that they were created in. Projects created in COMMAND Center™ Concrete 4 App will only be accessible in COMMAND Center™ Concrete 4 App and projects created in COMMAND Center™ 3.0 can only be accessed in COMMAND Center™ 3.0 . If a COMMAND Center™ 3.0 user shares a project with you, you will only be able to accept the invitation and open it in COMMAND Center™ 3.0 . The same is true in COMMAND Center™ Concrete 4 App.
Yes, you can be signed into both apps at the same time. Projects are specific to the version of the COMMAND Center™ App that they were created in. Projects created in COMMAND Center™ Concrete 4 App will only be accessible in COMMAND Center™ Concrete 4 App and projects created in COMMAND Center™ 3.0 can only be access in COMMAND Center™ 3.0 . You will only see the projects applicable to the version of the App you are in.
In COMMAND Center™ 3.0, when you sign out of the Cloud
- You can still do the following:
- See your projects listed on the projects screen.
- Update sensor data via the wireless on-site Bluetooth manual option .
- Access the data in the project to view in charts.
- Create reports.
- You cannot do the following:
- Sync new data or changes with the Cloud to back up or share with other users.
- Send or accept an invitation.
- Receive any new data collected and transmitted via the Wireless AutoCollector option.
- Be careful:
- Do not sign out of an account and sign into a different account on the same device.
- If you must share device between users, create a device-specific Cloud account that everyone uses.
- Call us for support: 512-451-6233.
In COMMAND Center™ Concrete 4 App, when you sign out of the Cloud
- You can still do the following
- Create new projects and collect data via the wireless Bluetooth option.
- Update data via the wireless Bluetooth option.
- Access the data in the project to view in charts.
- Create reports.
- You cannot do the following
- Access projects created while you were signed into the Cloud – they will no longer be visible.
- Sync new data or changes with the Cloud to back up or share with other users.
- Send or accept an invitation.
- Receive any new data collected and transmitted via the Wireless AutoCollector option.
- Be careful:
- Unlike COMMAND Center™ 3.0, you can share devices and sign in and out of your own account on the same device.
- You must sign back into the Cloud to share your new or changed data.
If you change your password, it will apply to both COMMAND Center™ 3.0 and COMMAND Center™ Concrete 4 App versions.
Sharing data
COMMAND Center™ 3.0 users cannot share projects with COMMAND Center™ Concrete 4 App users. Projects are specific to the version of the COMMAND Center™ App that they were created in. Projects created in COMMAND Center™ Concrete 4 App are only accessible in COMMAND Center™ Concrete 4 App and projects created in COMMAND Center™ 3.0 are only be access in COMMAND Center 3.0 . When signed into the Cloud, you will only see the projects applicable to the version of the App you are in.
COMMAND Center™ Concrete 4 App users cannot share projects with COMMAND Center™ 3.0 users. Projects are specific to the version of the COMMAND Center™ App that they were created in. Projects created in COMMAND Center™ Concrete 4 App will only be accessible in COMMAND Center™ Concrete 4 App and projects created in COMMAND Center™ 3.0 can only be access in COMMAND Center™ 3.0 . You will only see the projects applicable to the version of the App you are in.
You cannot share projects with the PC in the same way that you share project in the App with other iOS users. You can export projects from the App via email to the PC. This will allow PC users to see the data using the COMMAND Center™ Windows software. This exported file is not synced and will not update with any new data automatically.
No, you cannot accept an invitation to a COMMAND Center™ project from your email or on your PC. When an invitation is sent, it triggers an email to that invited person to let them know there is an invitation waiting for them.
To accept the invitation, the user will have to
- Open the right version of the App (COMMAND Center™ 3.0 or COMMAND Center™ Concrete 4 App) on their iOS device.
- Tap on the account icon.
- Accept the invitation.
Projects and Placements
Projects and placements are levels of organization in the COMMAND Center™ App. In COMMAND Center™ 3.0, users can only group sensors together in projects and should limit the total number of sensors in a project. In COMMAND Center™ Concrete 4 App, users group sensors in placements under projects and are not limited to the total number of sensors in a placement. By adding the placement level in COMMAND Center™ Concrete 4 App, users have a more intuitive way of organizing like sensors in hierarchy that is set up with the intent to ultimately reduce overall redundant inputs.
In COMMAND Center™ 3.0, specifications are project specific:
- Open the project.
- Tap on Specs.
- Enter inputs accordingly.
In COMMAND Center™ Concrete 4 App, specifications are placement specific:
- Open the project.
- Open the Placement.
- Tap on the settings icon to access the Specifications for the Placement.
- Enter inputs accordingly.
In COMMAND Center™ Concrete 4 App, there are no default values provided for specification inputs. The user must fill in the blank with mix-specific inputs accordingly. However, after the user has entered specification inputs for the first placement, subsequent placements will have these inputs automatically filled in with the same values. This will hopefully reduce repetitive data entry.
Common values often specified for some inputs are:
- Maximum Concrete Temperature = 160° F
- Minimum Concrete Temperature = 50° F
- Temperature Differential = 35° F
- Datum Temperature = 0° and/or -10° C (14° and/or 32° F)
- Activation Energy = 46,000 KJ
In COMMAND Center™ Concrete 4 App, there are no default values provided for specification inputs. There are some common values often specified for temperature limits and maturity constants.
Common values used for some inputs are:
- Maximum Concrete Temperature = 160° F
- Minimum Concrete Temperature = 50° F
- Temperature Differential = 35° F
- Datum Temperature = 0° and/or -10° C (14° and/or 32° F)
- Activation Energy = 46,000 KJ
In COMMAND Center™ Concrete 4 App, there are no default values provided for specification inputs. The user must fill in the blank with mix-specific inputs accordingly. However, after the user has entered specification inputs for the first placement, subsequent placements will have these inputs automatically filled in with the same values. This will hopefully reduce repetitive data entry. If the auto filled inputs do not apply, the user can always change them accordingly.
Archiving
You cannot delete projects. You can archive projects.
You cannot delete placements. You cannot archive placements. The placements that are not opened often will fall to the bottom of the list when sorted by recently opened.
To archive a project, backwards swipe over the name. The Archive option appears. Tap on it.
In COMMAND Center™ Concrete 4 App, the Archive folder allows users to hide projects they no longer want to see in their list. Archiving projects, even share projects, does not affect any other user.
Yes, you can unarchive projects by
- opening the archive folder
- Find the project to unarchive.
- Backwards swipe over the name.
- Tap on unarchive.
You cannot archive placements and you cannot delete them. The placements that are not opened often will fall to the bottom of the list when sorted by recently opened.
You cannot archive sensors; you can delete them. Backward swipe over the name of the sensor and tap delete.
Adding a sensor in COMMAND Center™ Concrete 4 App
Adding a sensor means you are introducing it for the first time in the App. You should add sensors to a project or placement before securing them in the field. COMMAND Center 3.0 users add sensors to projects via the wireless Bluetooth option. But in COMMAND Center™ Concrete 4 App, sensors are added to placements within projects via the wireless Bluetooth option or scanning the label.Adding a sensor means you are introducing it for the first time in the App. You should add sensors to a project or placement before securing them in the field. COMMAND Center 3.0 users add sensors to projects via the wireless Bluetooth option. But in COMMAND Center™ Concrete 4 App, sensors are added to placements within projects via the wireless Bluetooth option or scanning the label.
Adding a sensor in COMMAND Center™ Concrete 4 App is easy:
- Open the project.
- Open the placement.
- Tap on the plus icon.
- Tap Scan label.
- The camera appears for you to hover over the code and wait for the sensor details screen to appear.
- Once you add the sensor, you will see it in the Sensors list screen, BUT THERE IS NO DATA yet.
- You must update the sensor via the Bluetooth option or by connecting it via the AutoCollect setup to transmit sensor data into the App.
To add a sensor via Bluetooth
- Open a project and open a placement.
- Attach a sensor to the SRM.
- Tap on the plus and select Scan SRM. All sensors attached to SRMs that are within 20-30 ft of you that are not already in this placement will appear.
- Tap on the sensor you want to add to the placement. If you are within range of other sensors that appear on your list, you will need to know the serial number of the sensor you want to add. Look on the label.
- Stay within range of the sensor you are trying to add while the App makes a connection and you enter sensor details.
- Once it is added, you will see it in the Sensors list with a timestamp and data for the last point collected. If you do not see a timestamp, be sure that you entered a placement date and time that is correct. To check the placement date and time, tap on the sensor to open the Sensor Details screen.
- Tap in the circle to the left to activate the sensor and see data in the Chart.
In the Sensor Details screen in COMMAND Center™ 3.0, there is a field titled ‘Notification Enabled’. In COMMAND Center™ Concrete 4 App, this field is more intuitively labeled ‘Alerts Enabled’. In both App versions, this field ensures the sensor is included in the calculation of alerts for that placement. If there is a sensor in the group that should not be included in alert calculations, disable this field by sliding the slider to the left. For example, the ambient sensor is often excluded from the calculation of temperature differentials.
Yes, the same sensor can be added to multiple projects and placements. Beware that if you are collecting data using the wireless Bluetooth option, you will have to update this sensor in each project and placement. If you are using the Wireless AutoCollector option, the sensor will automatically update in all projects and placements.
To delete a sensor, backward swipe over the name of the sensor and tap delete.
In order for the App to calculate strength data based on a known maturity curve and the temperature history data collected by the sensor, you must have maturity and strength information entered in the placement specifications screen. You can get all of the information you need for these inputs from your maturity curve report.
Adding a sensor means you are introducing it for the first time in the App. You should add sensors to a project or placement before securing them in the field. COMMAND Center 3.0 users add sensors to projects via the wireless Bluetooth option. But in COMMAND Center™ Concrete 4 App, sensors are added to placements within projects via the wireless Bluetooth option or scanning the label.
Firmware updates
A firmware update will improve the functionality of your SRM and AutoCollect devices by pushing new operational instructions to those devices via the Bluetooth connection. When you see a prompt that says there is a firmware update, update!
When you see a prompt that says there is a firmware update, update! Stay where you are so that you remain in range of the device you are updating until the update is complete.
No, the firmware update will not affect any data. There will be no data loss, data degradation, data changes because of a firmware update. Just do it!
Setting up equipment in the field
Keep in mind that the cable is the lifeline to the sensor and all data stored there. Damage during construction can lead to a severed connection and loss of ability to collect data. While the COMMAND Center™ sensors are durable and hold up very well in the field best practices are good guidelines to follow.
You can secure sensors in place before concrete is placed.
- Secure the sensor cable to the existing rebar.
- We recommend zip ties, but tie wires are known to work, too. Be careful the tie wire does not knick the cable.
- The first tie should be where the yellow and orange meet. Do not strangle the sensor by tying it off immediately where the sensor head and sensor cable come together.
- For sensors placed deeper into structures, secure the sensor to existing rebar at several locations.
- You do not have to turn sensors on. They are shipped to you already turned on and ready to collect your concrete data at the programmed intervals you specificed when you ordered them.
- Avoid hitting the sensors closer to the surface with the immersion vibrating wand when consolidating.
- Avoid cutting the cables too short so that an SRM cannot connect to the cable ends.
You can embed sensors immediately after fresh concrete has been placed.
- Press the sensor head to the depth required.
- Be sure to consolidate concrete immediately above it.
- Beware that in this case, your sensor is not secured in place until the concrete has set and hardened.
If you are using the wireless Bluetooth option, there is no limit to the number of sensors you can connect to an SRM. You are only restricted by the size of your fingers and your patience with getting all sensor ends into the clips at once.
If you are using the AutoCollector option, you are limited to only two sensors per SRM.
If you are using the wireless Bluetooth option, you do not have to leave the SRM in place and connected to the sensors. You only have to connect the SRM when you are ready to collect all of the data that is stored on the sensors so that you can view, analyze, and report it. You can choose to leave the SRM in place and continuously connected when sensors are in hard to reach or hazardous locations if you can stand within 20-30 ft to collect the data.
If you are using the AutoCollect option, you do have to leave the SRMs in place, turned on, and continuously connected to the sensors.
For the on-site Bluetooth option, you have to set up the sensors and maybe the SRM. you do not have to leave the SRM in place and connected to the sensors. You only have to connect the SRM when you are ready to collect all of the data that is stored on the sensors so that you can view, analyze, and report it. You can choose to leave the SRM in place and continuously connected when sensors are in hard to reach or hazardous locations if you can stand within 20-30 ft to collect the data. Remember data is always being collected at the programmed interval and stored on the sensor itself. The SRM is the data transmitter that collects a copy of the data that is on the sensor and ultimately pushes it to the App where you can view, analyze, and report it.
- If you are not leaving the SRM in place on-site:
- Secure sensors in place.
- Be sure cable ends are up and out of the way from concrete when concrete is placed.
- If you are leaving the SRM in place because in is a hard to reach or hazardous location:
- Connect black cable to black clip and red cable to red clip.
- Be sure you have two AA-cell batteries in the SRM battery holder.
- Turn on the SRM – the light will flash green, yellow, or red to indicate battery life.
- Secure it in place.
- This can be done after concrete is placed to minimize the potential for damage during the placement.
Before you set up anything in the field for the AutoCollect option, you should first add the sensors you plan to use to the placement in the COMMAND Center™ App using the wireless Bluetooth option. Then, you will need to secure sensors and SRMs in place on-site and secure the AutoCollect within range of all SRMs from which it must receive data.
- Add sensors to COMMAND Center™ App.
- Secure the sensors in place.
- Connect black cable to black clip and red cable to red clip.
- Be sure you have two AA-cell batteries in the battery holder.
- Turn on the SRM – the light will flash green, yellow, or red to indicate battery life.
- Close the SRM and secure it in place.
- To connect sensors to the AutoCollect:
- Be sure you have 4 D-cell batteries in the AutoCollect: two batteries into each holder.
- Thread sensors through the ports from the outside in.
- Be sure to keep the grommets in place. For ports that you will not use, be sure you secure a stopper in the port to prevent moisture ingress.
- Have just enough cable inside of the AutoCollect box so that when you open the lid, it does not pull on the cables.
- Unscrew the red and block knobs for each port.
- Thread the end of the cable through the hole under the knob: black to black, red to red.
- Tighten the knob to secure the cable connection.
- Close the lid.
- Turn the AutoCollect on by pressing in the red button.
- Watch the light flash to know what is going on. Open the lid and refer to the legend if necessary.
- SRMs must be secured in place and within 100 yards of an AutoCollect and turned on.
- You must have a cellular connection on-site.
- The AutoCollect light will flash to let users know what is going on – see the Legend.
- Data is now flowing automatically from the sensor through the SRM to the Autocollect into the Cloud and out to all shared users.
- If you are using the COMMAND Center™ 3.0 App, turn off Bluetooth for the App before viewing data in the field and while within range of any SRM or AutoCollect.
Updating sensors
If you are using the COMMAND Center™ 3.0 App and using a single SRM that you are connecting to/disconnecting from sensors at various locations:
- Connect the sensor or sensors to the SRM.
- Connect black cable to black clip and red cable to red clip.
- Be sure you have two AA-cell batteries in the SRM battery holder.
- Turn on the SRM – the light will flash green, yellow, or red to indicate battery life.
- Stand within 20-30 ft of the SRM connected to the sensors you want to update.
- Open the project.
- You will see a Bluetooth icon appear next to the sensor it is updating.
- The timestamp will update to indicate the sensor updated.
If you are using COMMAND Center™ Concrete 4 App and you left SRMs continuously connected and in place:
- Stand within 20-30 ft of the SRM connected to the sensors you want to update.
- Open the project.
- Tap on Update. You will see any SRMs you are with range of that are connected to sensor s in the placement you opened.
- You will see a Bluetooth icon appear next to the sensor it is updating. The icon will cycle through each sensor with which it is able to connect.
- The timestamp will update to indicate the sensor updated.
If you are using the COMMAND Center™ Concrete 4 App and using a single SRM that you are connecting to/disconnecting from sensors at various locations:
- Connect the sensor or sensors to the SRM.
- Connect black cable to black clip and red cable to red clip.
- Be sure you have two AA-cell batteries in the SRM battery holder.
- Turn on the SRM – the light will flash green, yellow, or red to indicate battery life.
- Stand within 20-30 ft of the SRM connected to the sensors you want to update.
- Open the project.
- Open the placement.
- Tap Update. You should see the SRM and all sensors the SRM is making a connection with listed.
- You can choose to update the sensors individually or all sensors at once.
- The timestamp will update to indicate the sensor updated.
If you are using COMMAND Center™ Concrete 4 App and you left SRMs continuously connected and in place:
- Stand within 20-30 ft of the SRM connected to the sensors you want to update.
- Open the project.
- Open the placement.
- Tap on Update. You will see any SRMs you are within range of that are connected to sensor s in the placement you opened.
- Choose the sensor or sensors to update in the list that appears.
- You can also choose to update all sensors within range at once.
- The timestamp will update to indicate the sensor updated.
If you do not see your sensor listed as one to update in the COMMAND Center™ Concrete 4 App, it may be that you are in the wrong placement or not within range. For the wireless Bluetooth option, you must eb within 20-30 ft of the SRM while it is on and connected to a sensor in order to collect data.
It is not uncommon for sensors within a placement to fall behind and seem to lag with updates. This lag should resolve itself within an interval or two. Anything longer than that suggests we need to do some troubleshooting.
- Check the battery life of the AutoCollector and SRMs.
- Check the physical connections of the sensors to the AutoCollector or SRMs.
- Be sure the SRM is within range of the AutoCollector.
- Reset the AutoCollector memory and wait at least two intervals.
- Call us.
If any of your sensors fall behind by more than 24 hours, call us for support in order to avoid data gaps!
Alerts
Once a placement has been created, you can go back into the specifications screen and the alerts field will be active.
Ambient sensors are a perfect example of a sensor for which you would not the alerts enabled. In most cases, knowing when the ambient sensor reaches a temperature limit or strength goal is not useful to alert recipients and may not be efficient.
To disable a sensors from the calculation of alerts:
- Open a placement.
- Tap on the sensor to open the Sensor Details.
- Slide the slider for ‘Alerts Enabled’ or ‘Notifications Enabled’ to the right to disable.
- REMEMBER: disabling this field only affects alerts. Be sure to deselect the sensor when graphing multiple sensors on a chart and when graphing the temperature differential.
Charts
If the placement date and time is not set correctly, you may not see data in the chart. If you do not see any data for a sensor in the chart, check the following:
- Be sure the placement date and time for the sensor is correct.
- Be sure the sensor is selected for graphing on the chart.
Open the placement and see the list of sensors. Tap in the circle to the left of each sensor you want to graph at the same time in the chart.
You must have inputs for maturity and curve-fit fields populated with mix-specific information in the specifications for the placement.
In COMMAND Center™ Concrete 4 App, users enter temperature units and maturity units separately and they can be different.
Goals, or target values, for sensor data can be set in the Specifications screen. Once enabled, when the data for a sensor has achieved or gone beyond a set maturity or strength goal value, the user will be able to see when goals were achieved in the charts. Users can also set alerts for maturity and strength goals, which will send an email or text message to user-defined recipients notifying them of data reaching set goals.
Reports
To create a report in COMMAND Center™ 3.0:
- Open the project.
- Tap on Share.
- Tap on Reports.
- Select the report to generate.
To create a Temperature Differential report, you will need to export the file to your desktop.
To create a report in COMMAND Center™ Concrete 4 App:
- Open the project.
- Open the placement.
- Tap on the export icon.
- Select the report to generate.